
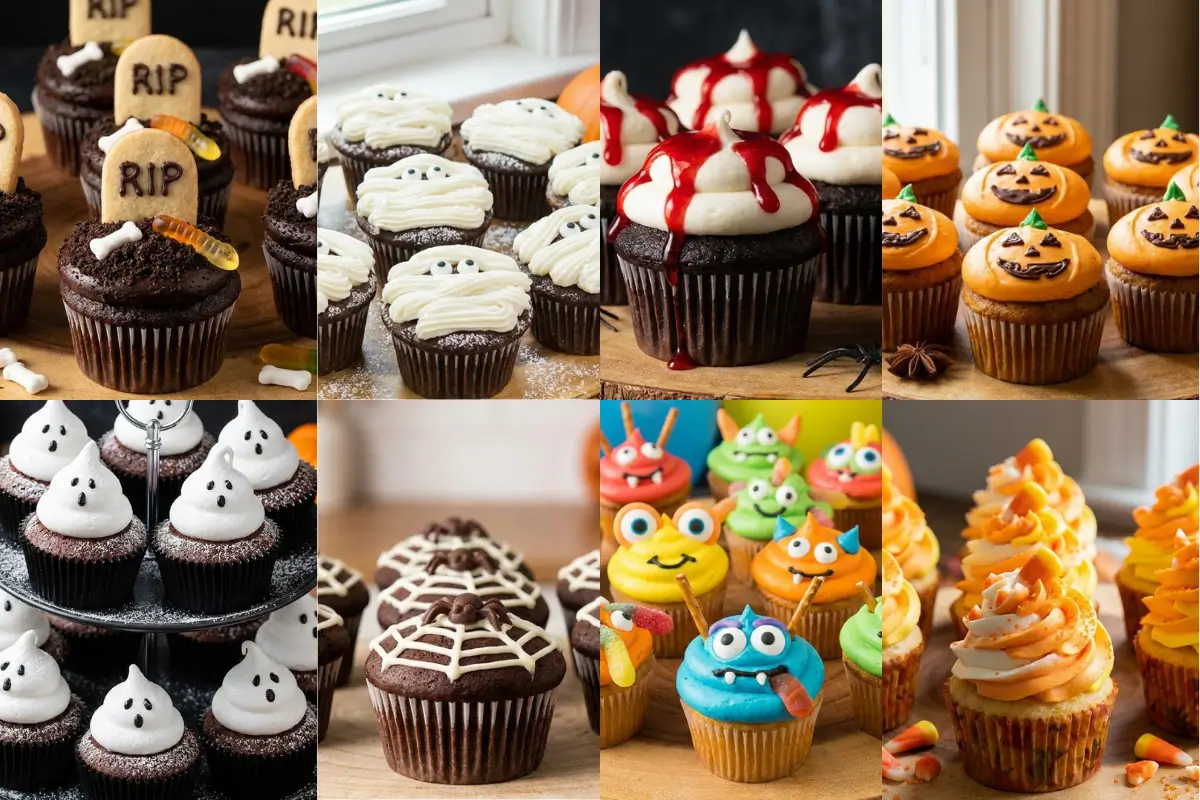
8 Spooky Halloween Cupcake Ideas were never something Nonna had pinned to a corkboard in her kitchen back home Halloween wasn't exactly a Southern Italian tradition. But when our family first celebrated it here, she did what she always did when something unfamiliar arrived at her door: she walked into the kitchen and made it hers.
I still remember the October afternoon she pulled out her old vanilla cupcake tin, set a bag of candy eyes on the counter, and said, "Facciamo qualcosa di bello. Let's make something beautiful. She had no idea what a ghost cupcake was supposed to look like. Neither did I.
But by the time we were done, my little cousins were running around the table making the most dramatic haunted-house sound effects you've ever heard, and every single cupcake was gone in about seven minutes.
That's the thing about Halloween baking that nobody tells you: it doesn't have to be perfect to be magical. It just has to be yours.
If you've been scrolling through Halloween cupcake photos feeling equal parts inspired and overwhelmed, wondering how anyone's ghost frosting stays upright or how that spider web actually works, I want you to take a breath. Because this guide is not a listicle.
It's a playbook. I'll show you eight spooky designs, and for each one, I'll tell you the honest technique tip that actually makes it work. No vague "just decorate with candy eyes" and call it a day. Real instructions, real results, and real warmth just like that October afternoon in Nonna's kitchen.
Ready? Let's make something beautiful.
What You Need Before You Start: Frosting, Tools & The One Thing Everyone Gets Wrong
Here's the part everyone skips, and it's why half of Halloween cupcakes don't turn out the way the photo promised.
Before we talk about ghosts, spider webs, and graveyard scenes, we need to talk about frosting. Because the 1 reason Halloween cupcake decorations fail ghost peaks that droop, spider webs that smear, candy eyes that slide off overnight is not the design. It's the frosting consistency.
The Frosting Truth
For Halloween cupcake decorating, you need stiff buttercream. Not whipped. Not cream cheese. Not the soft, cloud-like swirl you'd pipe on a birthday cupcake.
Stiff buttercream holds its shape under the weight of candy decorations and holds its peak when you pipe it upright. You'll know it's ready when you pull the mixer beater out and the frosting stands in a firm, non-drooping peak without bending at the tip.
If you're using store-bought frosting (no judgment here we're busy, and Halloween comes fast), here's the trick: add 2–3 tablespoons of powdered sugar per cup of frosting and mix until stiff. It works beautifully.
The Color Truth
For deep Halloween colors true black, rich orange, and vivid purple gel food coloring is non-negotiable. Liquid food coloring adds too much moisture and turns your black frosting a sad, muddy gray. Gel gives you the intensity without thinning the buttercream.
For black frosting specifically: mix in gel coloring, cover the bowl, and let it rest for at least 2 hours (ideally overnight). The color deepens as it sits. This is the step everyone skips and then wonders why their "black" frosting looks charcoal at best.
The Cool-First Rule
Your cupcakes must be completely cool before you frost or decorate them. Completely. I know it's tempting when they smell like warm vanilla, and Halloween is tomorrow, but warm cupcakes melt your frosting and cause every candy decoration to slide right off by the next morning.
Cool them on a wire rack for at least one hour, or pop them in the fridge for 20 minutes if you're short on time.
Tools You'll Need (And What to Sub)
Piping bags disposable works perfectly
1M star tip for ghost peaks and swirls (a round tip works too, just gives a slightly different look)
Round tip (Wilton #12 or similar) for mummy strips and spider webs
Toothpicks are your secret weapon for spiderweb drag lines
Candy eyes available at most grocery stores near the baking supplies; small M&Ms or chocolate chips work in a pinch
Offset spatula or butter knife for spreading frosting as a base
That's genuinely all you need. You're already more prepared than you think.
8 Spooky Halloween Cupcake Ideas (With Decoration Instructions That Actually Work)
This is the fun part, and it's more achievable than it looks.
I've organized these from easiest to most impressive, so if you're a first-time Halloween decorator, start with number one and build your confidence as you go. If you're a seasoned baker looking for a showstopper, jump straight to the graveyard or the bloody drip.
Either way, each design comes with the honest technical note that makes it actually work, not just look good in a photo.
1. Ghost Cupcakes
There's something about a ghost cupcake that makes everyone in the kitchen smile even Nonna, who had never once carved a pumpkin in her life.
Ghost cupcakes are the most iconic Halloween design for a reason: they're visually dramatic, deeply charming, and completely achievable for any skill level. The key is that frosting peak, which is why we just spent time on buttercream consistency.
How to decorate:
Fill your piping bag with stiff white buttercream and fit it with a round tip (or simply snip a ½-inch opening in the bag).
Hold the bag straight up, about ½ inch above the center of the cupcake.
Apply steady pressure and pipe upward in one slow, continuous squeeze, then release pressure and pull up quickly to form the peak. The peak is the ghost's head.
Place two candy eyes just below the peak while the frosting is still soft.
The honest tip: If your peak droops, your frosting is too soft. Add another tablespoon of powdered sugar, remix, and try again. A perfectly imperfect ghost with slightly lopsided eyes is still 100% adorable and deeply on-brand for Halloween.
You'll know it's right when the peak holds upright without bending for at least 30 seconds after piping.
2. Spider Web Cupcakes
My favorite thing about spider webs is that the messier they look, the more realistic they are. Take that, perfectionism.
How to decorate:
Frost cupcakes with a smooth layer of black or dark orange buttercream (offset spatula works perfectly).
Fit a piping bag with a small round tip and fill with white buttercream. Pipe 3–4 concentric circles on top of the dark frosting, starting small in the center and expanding outward.
Immediately before the white frosting sets drag a toothpick from the center outward through the circles, like clock hands, 6–8 times around the cupcake.
The toothpick pulls the white circles into the classic web pattern.
The honest tip: You have about 60–90 seconds after piping the circles before the frosting starts to set, and the drag won't work cleanly. Work one cupcake at a time. If yours smears a little, lean into it. Halloween is supposed to feel a little wild.
Here's the trick I learned the hard way: if the frosting is too thick, the toothpick drags it in chunks instead of drawing a clean line. Thin your white piping frosting with a tiny drop of cream until it flows smoothly.
3. Mummy Cupcakes
Mummy cupcakes are the ones that consistently make children absolutely lose their minds, and they're shockingly easy to make.
How to decorate:
Frost cupcakes with a smooth base of white or ivory buttercream.
Fit a piping bag with a round tip and pipe random horizontal strips across the cupcake in slightly varying directions overlapping is perfect and intentional.
Place two candy eyes in the upper third of the cupcake, peering out between the "wrapping."
The honest tip: The "messy mummy" is the goal. Uneven, overlapping strips look more like real bandage wrapping than perfectly parallel lines. Most people overthink this one, and it's honestly one of the most forgiving designs on this list.
If yours looks messy here, that's completely normal. It's supposed to. That's the charm.
4. Monster Face Cupcakes
Green cupcakes were not something Nonna ever made. But she would have loved the sound of my cousins arguing over whose monster looked scarier.
How to decorate:
Frost cupcakes generously with stiff green buttercream (gel coloring in "leaf green" or "electric green").
Build the monster face with candy pieces: candy eyes for the eyes, a strip of red fruit leather or candy for the mouth, and mini chocolate chips or sprinkles for any additional details.
For Frankenstein's neck bolts: press a pretzel stick gently into each side of the cupcake.
The honest tip: Place candy decorations while the frosting is just set but not fully firm it acts as a natural adhesive. If you wait too long, use a tiny dab of frosting on the back of each piece to secure it.
This is what I make when I want the kids in the kitchen with me. The decorating is entirely hands-on and impossible to mess up.
5. Graveyard Cupcakes
This one is for the entertainer planning a Halloween party. It's your showstopper.
How to decorate:
Frost cupcakes generously with dark chocolate or black buttercream, smoothed flat on top.
Crush 2–3 Oreo cookies into fine crumbs and press them gently into the frosting to create a "dirt" surface.
Insert a rectangular chocolate cookie or graham cracker "tombstone" into the crumbs at an angle. Write "RIP" with white chocolate or a food-safe marker.
Add optional accents: a candy pumpkin, a gummy worm peeking from the "dirt," or small candy ghosts.
The honest tip: Add the Oreo crumbs the day of, not the night before. Oreo crumbs absorb moisture from the buttercream and become soft and clumped by the next morning.
The tombstone cookie can be inserted the night before; the crumbs go on just before the party.
Most people miss this step, but it makes all the difference between a showstopper and a soggy graveyard.
6. Candy Corn Swirl Cupcakes
These are the ones that photograph best—and your guests will not believe you made them yourself.
How to decorate:
Divide your stiff buttercream into three portions. Leave one white, tint one bright orange with gel coloring, and tint one yellow.
Lay a strip of plastic wrap flat. Spread a stripe of each color side by side (white, orange, and yellow) along the length of the wrap.
Roll the plastic wrap into a log, snip one end, and insert the log into your piping bag. When you pipe, all three colors will emerge at once, creating a natural gradient swirl.
Pipe in a classic swirl motion and top with a candy corn piece for decoration.
The honest tip: Keep your colors distinct when placing them in the plastic wrap if they blend too much before piping, you'll lose the gradient effect. Work quickly and don't over-mix once they're in the bag.
You'll know it's working when the first swirl out of the bag shows all three colors cleanly. If it looks muddled, gently pull a bit more frosting through before piping the first cupcake.
7. Bloody Drip Cupcakes
Not for the faint of heart, but absolutely for the entertainer who wants a dramatic table moment.
How to decorate:
Frost cupcakes with a smooth white buttercream base and let it set for 20 minutes in the refrigerator.
Mix red gel food coloring into a small amount of white or very light pink buttercream until you achieve a rich, deep red. Thin slightly with ½ teaspoon of cream until it flows slowly off a spoon.
Spoon the red "blood" drip over the edge of each chilled cupcake, letting it run down the sides naturally. Use the back of a spoon to guide it.
The honest tip: The drip must be slightly warmer than the chilled frosting base to flow properly. If your drip is too thick, it will sit in a blob instead of running. If it's too thin, it will run too fast and pool at the bottom. Test one cupcake first before committing to the whole batch.
This is the moment everyone overthinks, but you won't. Test one. Adjust. Then do the rest.
8. Pumpkin Spice Cupcakes with Jack-O'-Lantern Faces
This one is for the baker who wants Halloween to taste like Halloween, not just look like it.
These start with a warmly spiced pumpkin base cupcake the smell when they come out of the oven is pure October, and they're decorated with the simplest jack-o'-lantern faces imaginable.
How to decorate:
Frost cupcakes with a generous swirl of stiff orange buttercream.
Use a food-safe black gel writing pen (or a toothpick dipped in black gel coloring) to draw simple triangle eyes, a triangle nose, and a gap-toothed mouth on each cupcake.
Alternatively, place small black candy pieces or chocolate chips in the face positions press gently into the frosting to secure.
The honest tip: Keep the faces simple. Three triangles and a jagged smile are more recognizable and more charming than an elaborate carved design. Jack-o'-lanterns are supposed to look a little goofy. That's their whole personality.
My family always asks for these on the first weekend of October. The spice fills the whole kitchen, and suddenly everything feels festive.
Why These Decorations Actually Work
Here's the part everyone overthinks, but once you understand the why, you'll never second-guess yourself again.
Every single one of these eight designs is built on the same small set of principles. Once you know them, you can improvise, adapt, and even invent your own designs.
The stiff buttercream principle: Structure before style. Frosting that is too soft can't hold a ghost peak, can't hold a spiderweb line, and can't support candy decorations overnight. All the creativity in the world won't save you if your frosting is the wrong consistency. Stiff buttercream is your foundation.
The gel coloring is the truth: Liquid food coloring adds water to your buttercream and dilutes the color intensity. For Halloween's deep, saturated palette, especially black, orange, and purple, gel food coloring is the only thing that reliably delivers.
And for true black: mix, cover, and rest overnight. The color develops and deepens significantly in the first 12–24 hours.
The cool-first rule: Decorating warm cupcakes is the #1 cause of candy eyes sliding off, frosting melting on contact, and designs collapsing by party time. One hour on a wire rack, minimum, or 20 minutes in the refrigerator.
The cupcake must be completely at room temperature or cooler before a single drop of frosting touches it.
The toothpick as a tool: A regular toothpick is the secret behind spider webs, swirl patterns, and precise candy placement. It costs nothing and changes everything. Keep a small cup of them on your workspace.
The intentional imperfect principle: Halloween decorating is one of the only occasions in baking where imperfection is not just acceptable it's aesthetically correct. Ghosts look more endearing with wobbly eyes.
Mummies look more realistic with uneven strips. Graveyards look more haunted with asymmetrical tombstones. Let yourself be messy. It's Halloween.
See? You already understand this better than most people who've been baking Halloween cupcakes for years.
Elena's No-Fail Tips for Halloween Cupcakes
Take a breath—this section is your safety net, and it has answers to every question you've been holding.
Why Does My Ghost Frosting Fall Over?
This is the most common Halloween cupcake frustration, and the answer is almost always the same: the frosting isn't stiff enough.
Ghost frosting needs to be stiff enough to hold a vertical peak under its own weight. If you pull the mixer beater out and the frosting bends at the tip instead of standing straight up, it needs more powdered sugar.
Add a tablespoon at a time, mixing briefly between additions, until it holds a firm upright peak.
If your peak collapses after piping, you can rescue it: scrape the frosting back off, add more powdered sugar, remix, and pipe again. The cupcake base is fine. Nothing is wasted.
How Do I Get True Black Frosting Without It Turning Gray?
Black frosting is one of the most complained-about topics in Halloween baking, and for good reason. Liquid food coloring will never give you true black; it gives you dark gray and a lot of extra moisture in your buttercream. Use gel food coloring only.
The second trick is time. Mix your gel coloring into the buttercream, cover the bowl tightly, and let it rest at room temperature for at least 2 hours ideally overnight.
The color deepens significantly as it sits. What looks dark gray when you first mix it will often be a rich, deep black by the next morning.
One note: black frosting can temporarily tint mouths and teeth. If you're making these for small children and this concerns you, use very dark navy or dark purple as an alternative they still look dramatically spooky.
Or embrace it: Halloween is the one day when purple teeth are a feature, not a bug.
Can I Use Store-Bought Frosting for Halloween Cupcakes?
Yes, with one adjustment. Store-bought frosting is typically too soft for piped decorations like ghost peaks or mummy strips.
The fix is simple: transfer the frosting to a mixing bowl and beat in 2–3 tablespoons of powdered sugar per cup of frosting until it reaches a stiffer consistency. Test it with the peak test before loading your piping bag.
For spread-and-decorate designs like graveyard cupcakes or candy corn swirls (where a base layer is applied and then topped), store-bought frosting works beautifully as-is.
My Spider Web Smeared: What Went Wrong?
Two possible causes: your white piping frosting was too thick, or you waited too long after piping the circles to drag the toothpick.
If it was too thick, thin the white piping frosting with a tiny drop of cream (half a teaspoon at a time) until it flows smoothly off a spoon but still holds its shape.
If timing is the issue, work faster on the next cupcake you have about 60–90 seconds after piping the circles before they start to set. Pipe the circles and drag immediately.
If the web is smeared regardless, it's honestly still beautiful. Call it an "abstract web" and move on. Nobody at a Halloween party is looking for perfection they're looking for fun.
Are These Safe for School? What About Allergies?
This is something almost no Halloween cupcake guide addresses, and for a lot of parents, it's the most important question on the list.
For a nut-free school party: choose a vanilla or pumpkin spice cupcake base made without almond flour or nut-based extracts, and check your candy eye packaging carefully some brands are processed in facilities that handle nuts.
Look for "may contain" warnings on any packaged candy decorations. My gluten-free vanilla cupcake recipe works beautifully as the base for any of these designs if you need to accommodate gluten sensitivities too.
For dairy-free frosting: a vegan shortening-based buttercream (Miyoko's or Spectrum vegetable shortening) whipped with powdered sugar and a splash of non-dairy milk works excellently for all eight designs on this list.
For gluten-free: a 1:1 gluten-free flour blend in the base cupcake recipe works beautifully, and all the decoration elements here are naturally gluten-free (confirm individual candy packaging).
When in doubt, check with the school or hosting parent before bringing anything, but know that every decoration idea on this list can be adapted without losing a single bit of its spooky charm.
How to Plan Your Halloween Like a Pro
Here's what I tell every parent planning a Halloween party: the secret to stunning cupcakes is not talent. It's a good timeline.
This section will eliminate your Halloween morning stress entirely.
2–3 Days Before:
Bake the cupcake bases. Cool completely, then store in an airtight container at room temperature. They keep beautifully for 3 days without frosting.
Make the buttercream. If making black frosting, do this now it needs at least 24 hours to deepen in color. Store in an airtight container at room temperature (up to 48 hours) or refrigerate (up to 1 week; bring to room temperature and re-whip before using).
1 Day Before:
Fill piping bags with your colored frostings and store them in the refrigerator overnight. Take them out 30–45 minutes before decorating to come back to room temperature.
Prepare any cookie tombstones, pretzel bolts, or other non-candy elements.
The Morning of the Party:
Decorate your cupcakes. This is the sweet spot where decorated cupcakes stay fresh and beautiful for 6–8 hours at room temperature.
Add Oreo crumb "dirt" to graveyard cupcakes last, right before the party, or no more than 1–2 hours ahead.
What NOT to Do Ahead:
Don't place Oreo crumbs on graveyard cupcakes more than 2 hours before serving (they go soggy).
Don't refrigerate decorated cupcakes unless your kitchen is very warm condensation can make candy eye colors bleed onto white frosting.
Transporting Decorated Cupcakes: Use a cupcake carrier with individual cup inserts that hold each cupcake steady. If you don't have one, a muffin tin lined with paper cups works as a transport tray place it in the trunk of your car on a flat surface. Tall decorations like ghost peaks need about 3 inches of vertical clearance, so measure before you pack.
You're already ahead of 90% of the people who will show up to that Halloween party. Enjoy the moment you made this.
Making Sweet Memories
Every Halloween since that first October in Nonna's kitchen, I've made cupcakes. Some years they've been elaborate graveyard scenes with hand-piped tombstones and entire storytelling landscapes made of crushed Oreos and gummy worms.
Other years they've been ghost cupcakes with slightly lopsided eyes and candy that slid to one side before I even got them to the table.
My cousins loved them both equally. Actually, I think they loved the lopsided ones more because making them was messier and louder, and more of the candy ended up in little hands before it ever made it onto a cupcake.
That's the thing about Halloween baking: the memory isn't in the perfection. It's in the orange kitchen light and the warm smell of vanilla and the sound of someone asking, "Can I put the eyes on?" before you've even finished piping.
It's in the chaos and the laughter and the feeling of making something together.
At AddCakes, we believe in memories, not masterpieces. Whatever your eight cupcakes look like tonight wobbly ghosts, smeared webs, graveyard scenes with slightly crooked tombstones they are perfect. Because you made them.
Which one are you trying first? Tell me in the comments I want to see your spooky creations.