
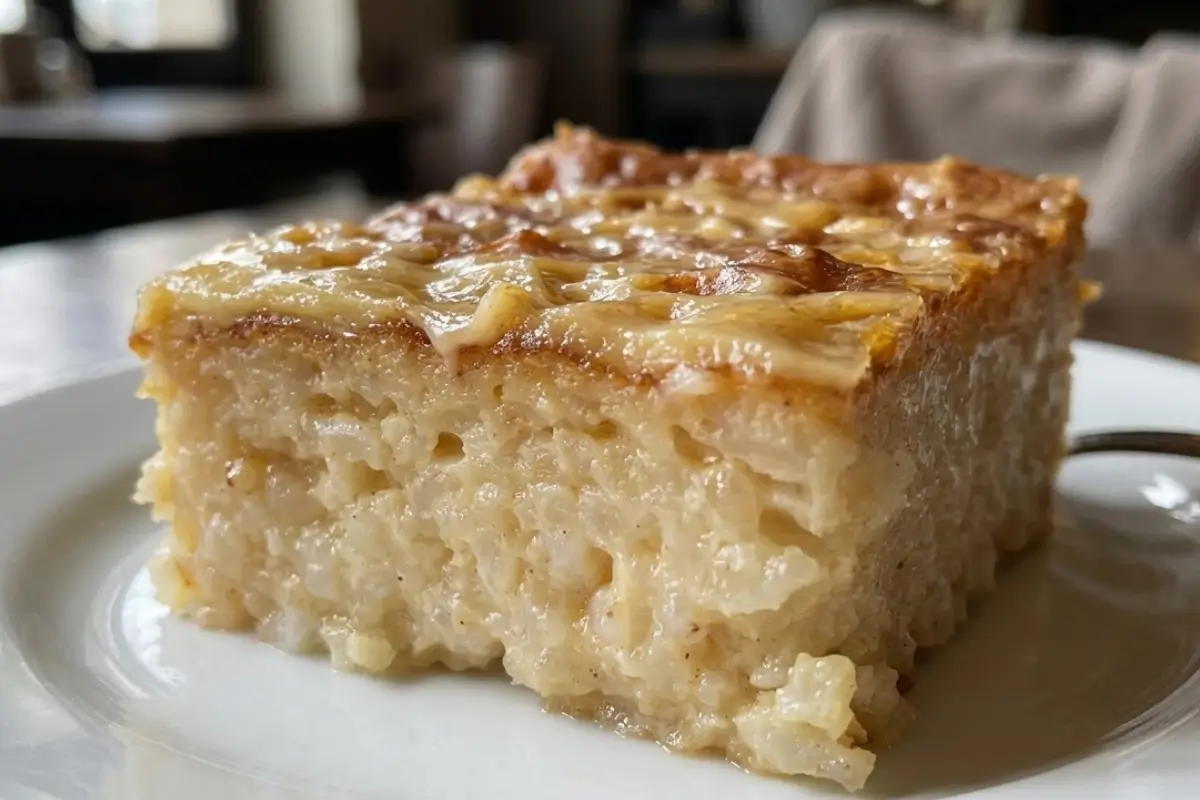
Japanese Rice Cake, specifically the version most of us are craving right now- butter mochi isn't something I grew up making in my Nonna's kitchen. Her flour was always wheat, her spoon always wooden, her Sunday afternoons always filled with the smell of proofing dough.
But food has a funny way of finding its place at a table anyway. The first time I tasted butter mochi, chewy and caramelized at the edges, still warm from the oven, I understood exactly why she would have loved it.
It's the same magic she chased in every recipe: something simple, made with your hands, that makes people go quiet for a second before they ask for more.
That's the thing about this recipe: it looks unfamiliar on paper, but it behaves like an old friend in the kitchen. No stand mixer drama, no finicky frosting, no fear of a collapsed center.
Just one bowl, one pan, and a cake that comes out chewy, golden, and a little bit magical every single time.
Why This One's Different
Here's what I want you to know before we start: this isn't a cake in the traditional sense, and that's exactly why it's so forgiving. There's no gluten structure to overwork, no butter temperature to obsess over, no delicate crumb that collapses if you open the oven door too soon.
Mochiko (sweet rice flour) behaves completely differently than regular flour it wants to be chewy, dense, and a little sticky, and once you stop fighting that and lean into it, you'll never make a bad batch.
The Key Ingredients For Japanese Rice Cake And Why They Matter
Mochiko (sweet rice flour): this is non-negotiable and not interchangeable with regular rice flour or all-purpose flour. Mochiko is glutinous rice flour (no gluten, despite the name), and it's the only thing that gives butter mochi its signature chew.
Look for the Koda Farms blue box it's the industry standard for a reason.
Full-fat coconut milk: the canned kind, not the carton beverage. This is what keeps the crumb moist for days and gives it that faint tropical richness. Light coconut milk will make the cake taste flat.
Evaporated milk: this is what butter mochi recipes get right that regular cake recipes don't: the concentrated milk proteins help the cake set with that slightly custardy, caramelized top.
Unsalted butter, melted: melted, not softened. You're not creaming anything here, so there's no need to worry about butter temperature the way you would for buttercream.
Sugar: this cake handles a generous amount of sugar well; it's part of what caramelizes into that gorgeous golden-brown top.
Eggs, room temperature: cold eggs will seize the melted butter into little clumps. If you forget to set them out, warm them in a bowl of warm water for five minutes.
Baking powder and vanilla: small amounts, but don't skip either; baking powder gives just enough lift so the cake isn't dense as a brick, and vanilla rounds out the coconut.
Dietary note: this recipe is naturally gluten-free since mochiko contains no wheat gluten just double-check your baking powder is a certified gluten-free brand if that matters for your household.
The Golden Rule Step-by-Step Instructions
1. Preheat and prep:
Preheat your oven to 350°F and generously butter a 9x13 baking pan; this cake loves to stick to bare metal or glass.
2. Whisk the wet ingredients first:
In a large bowl, whisk together the melted butter, coconut milk, evaporated milk, eggs, and vanilla until fully combined. Doing this before adding the dry ingredients prevents lumps later.
3. Add the dry ingredients:
Whisk in the mochiko, sugar, and baking powder directly into the wet mixture no need to sift separately first. The batter will be thin, almost like a pancake batter. That's correct; don't panic if it looks looser than a normal cake batter.
4. Pour and bake:
Pour the batter into your prepared pan and bake for 55-65 minutes, until the top is deeply golden brown and a toothpick comes out mostly clean. A few moist crumbs clinging to it are exactly what you want, since butter mochi is meant to be chewier and denser than a typical cake.
5. Cool completely before cutting:
This is the step almost everyone skips, and it's the one that makes or breaks your slices. Let the cake cool in the pan for at least an hour. Cutting it warm gives you a gummy, gluey mess instead of clean, chewy squares.
Why This Japanese Rice Cake Works
The rice flour is doing the work regular flour can't: Mochiko's starch structure is what creates that stretchy, chewy bite. This is the number one thing people get confused about when a batch turns out "wrong."
If your cake feels dense and slightly gummy, that's not a mistake. That's butter mochi.
Cooling time isn't optional it's chemistry: The cake continues to set as it cools, and the starches firm up into that signature chew. Cutting into it too early is the single most common reason people say their rice cake "fell apart" or "felt raw in the middle."
The golden-brown top is a flavor signal, not just a color: Those deep caramelized edges come from the sugar and milk proteins browning don't pull the cake early just because the center still looks slightly wobbly through the oven window.
A slight jiggle in the center at the 55-minute mark is normal; it firms up as it cools.
This cake is meant to taste different the next day: Many home bakers panic when day-two butter mochi feels chewier and denser; that's the rice flour continuing to hydrate, and it's actually when a lot of people say the texture is at its best.
Elena's No-Fail Tips
Why does mine turn out gummy instead of chewy?
This usually means it needed more time in the oven, not less. Underbaked butter mochi can look done on top while the center is still gummy.
Give it the full bake time and trust the cooling process. A slightly jiggly center at the end of baking is fine; a wet, shiny center is not.
Can I make this ahead of time?
Yes, and honestly, it might even be better the next day. Butter mochi keeps beautifully at room temperature, covered, for up to 3 days, or in the fridge for up to a week.
Just bring refrigerated pieces back to room temp or give them a quick 10-second zap in the microwave before serving; cold butter mochi loses some of its chew.
Can I use coconut cream instead of coconut milk?
I'd steer you away from it; coconut cream is too thick and will throw off the whole balance of wet-to-dry ingredients, leaving you with a drier, less custardy result. Stick with full-fat canned coconut milk.
What if I don't have evaporated milk?
Whole milk works in a pinch, but you'll lose a little of that rich, custardy quality the evaporated milk gives. If you can find it, it's worth the extra trip to the store.
Saving a Little Joy for Tomorrow
Butter mochi actually freezes well, which surprises most people the first time they try it. Cut it into squares, wrap each piece individually, and freeze for up to 2 months.
Thaw at room temperature for about an hour, or warm briefly in the microwave the texture bounces right back. For everyday storage, an airtight container at room temperature keeps it perfectly chewy for 2-3 days; refrigeration extends that to about a week, though the texture firms up a bit more the colder it gets.
The Most Comforting Rice Cake
Ingredients
- 1 ½ cups rice uncooked
- 6 cups water
- ⅓ cup coconut oil or ½ cup shortening
- 2 cups sugar or to taste
- 12 oz evaporated milk 1 can
- 14 oz coconut milk 1 can
- 13 oz sweetened condensed milk 1 can
- 1 teaspoon salt or to taste
- ½ teaspoon cinnamon
- ¼ teaspoon nutmeg
- 2 eggs well beaten
- 2 packages raisins optional
Instructions
- Preheat your oven to 350 degrees Fahrenheit.
- Cook the rice in six cups of water until almost all the liquid is absorbed by the grains.
- Stir in the evaporated milk and coconut milk.
- Add the sugar, salt, cinnamon, nutmeg, and coconut oil, mixing everything thoroughly so the flavors combine.
- Pour the beaten eggs in very slowly while stirring the pot continuously so the warm rice mixture does not accidentally scramble them.
- Pour the batter into your baking pan.
- Bake at 350 degrees for 3 hours, letting the house fill with that beautiful smell.
- Remove the pan from the oven and carefully spread a rich layer of sweetened condensed milk all over the top.
- Put it back in the oven and bake for 10 minutes longer to let it set.
- Serve it warm in a cozy bowl or let it cool to room temperature.
Notes
Making Sweet Memories
Nonna never had a box of mochiko in her pantry, but I like to think she'd have approved of this cake anyway not because it looks like anything from her kitchen, but because of what it does at the table.
It's the kind of dessert that gets passed around in silence for a second before someone asks who made it. That's really all any of us are chasing when we bake: not a perfect cake, but a moment worth remembering.
At AddCakes, we believe in memories, not masterpieces and this chewy, golden little rice cake is proof that sometimes the simplest recipes are the ones that stay with us the longest.