
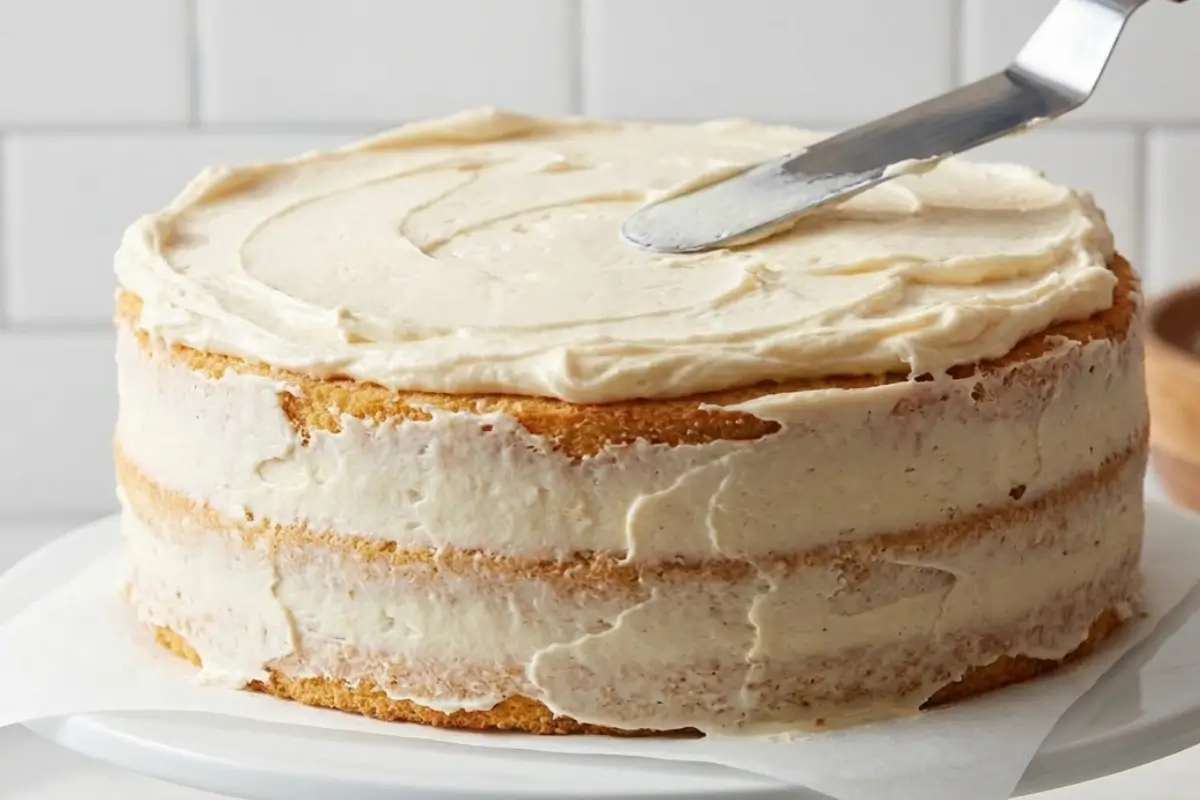
How to Crumb Coat a Cake is the question I wish someone had handed me the very first time I decorated a layer cake and watched in slow, helpless horror as my frosting dragged up little trails of chocolate crumbs straight to the surface.
It was supposed to be a birthday cake for my cousin Lucia. I had baked the layers carefully, let them cool, and made a big bowl of vanilla buttercream that smelled like something from Nonna's kitchen, and then I ruined the whole look in ten minutes flat.
Crumbs everywhere. Dark patches bleeding through the white frosting. I remember standing there with my offset spatula hovering in the air, genuinely considering starting over.
What I didn't know then, and what I want to tell you right now: I wasn't a bad baker. I was just missing one step.
The crumb coat. That one thin, quiet, almost invisible layer of frosting that goes on before the final coat. It traps every crumb, seals in the surface, and gives your frosting something clean and stable to hold onto. Once I started using it, every single cake I made looked better not just a little better. Genuinely, beautifully different.
If you've ever stared at crumb-streaked frosting and felt your heart drop, this is for you. We're going to fix that today.
What Exactly Is a Crumb Coat? (And Why Does It Change Everything)
This part is simpler than it sounds, I promise.
A crumb coat is a paper-thin layer of frosting applied all over the outside of your stacked cake before the final, pretty layer goes on. Think of it as a primer coat, the way you'd paint a wall before you add the real color.
Its job is not to look beautiful. Its job is to hold everything together underneath so your final layer can.
It does three things at once: it traps loose crumbs, so they can't work their way into the surface your guests will actually see; it seals in the cake's moisture so the inside stays soft; and it gives you a smooth, even foundation that makes the final frosting glide on like a dream.
Nonna would have called it tucking the cake in before the party. I think that's exactly right.
What You'll Need Before You Start
This step doesn't require a lot, just a few tools and one piece of patience.
Completely cooled cake layers: This is not optional. Warm cake melts frosting on contact, which means crumbs swim in a buttery puddle before you've even started.
If your cake came out of the oven in the last two hours, wait. Room temperature at minimum. Chilled is even better.
Buttercream at the right consistency: Here's the trick I learned the hard way: Cold, stiff buttercream tears the cake surface instead of gliding over it. You want your frosting to feel like soft, smooth, spreadable peanut butter.
If it's too stiff, let it sit at room temperature for a few minutes, then stir.
An offset spatula: The angled blade gives you control close to the cake's surface without your hand getting in the way.
A bench scraper: Optional but wonderful for smoothing the sides in one clean pass.
A turntable: Also optional, but it makes the whole process feel almost effortless. No turntable? A lazy Susan works. Even just rotating your plate by hand gets the job done.
A small separate bowl of frosting: Set aside about a cup or so of your buttercream just for the crumb coat. Do not dip back into your main batch once you've started; crumbs will contaminate it, and you'll end up with a streaky final coat. Keep the crumb bowl for the crumb coat, full stop.
How to crumb coat a cake Step by Step
Take a breath. You're doing great so far, and this is where the real magic begins.
Step 1: Level and brush your layers.
If your cake layers domed during baking, use a serrated knife to trim them flat. Then take a pastry brush and gently sweep away any loose surface crumbs from the top and sides of each layer.
You're not removing all crumbs, just the ones that are barely attached and waiting to cause trouble.
Step 2: Fill and stack your layers.
Place your first cake layer on a cake board or plate. Using your main batch of buttercream, pipe or spread a generous layer of frosting on top, spreading it to the edges.
If you're using a soft filling like jam or curd, pipe a small ring of stiff buttercream around the outer edge first. This is called a buttercream dam, and it keeps the filling from pushing out the sides as the layers press together.
Place the next layer on top, cut side down, and press gently so the layers are aligned and level.
Step 3: Scoop your crumb-coat frosting into a separate bowl.
Remember, this is your dedicated "crumb bowl." "Once it has crumbs in it, that's fine. That's its job. It never goes back into the main batch.
Step 4: Apply the crumb coat.
Using your offset spatula, scoop some frosting from your crumb bowl and spread a thin layer across the top of the cake first, pushing it gently to the edges. Then work down the sides, spreading frosting in thin, even strokes until the whole cake is covered.
Here's what I need you to hear right now: it is supposed to look like this. Patchy. Thin. Maybe a little crumb-streaked. You should be able to see the cake through it in places.
That's not a mistake. That's exactly right. The crumb coat is not the finish; it's the foundation, and foundations don't need to be pretty.
Don't go back and forth too much. Apply, smooth once or twice with your bench scraper, and leave it alone. Overworking it pulls crumbs right back out.
Step 5: Chill in the refrigerator for 20–30 minutes.
Pop your crumb-coated cake in the fridge, not the freezer. Freezing can cause the buttercream to crack, which is the opposite of what we're after. Refrigerating it for 20–30 minutes is all it needs.
You'll know it's ready when you can lightly press the surface with your fingertip and it doesn't leave a dent. Firm to the touch. That's your signal.
Step 6: Apply your final coat.
Now and only now bring out your main batch of fresh, crumb-free frosting. Frost the top and sides as generously as you like, smooth it with your bench scraper, and decorate to your heart's content.
The surface is clean, stable, and ready. This is where your cake becomes the one everyone photographs.
Why This Works
Here's the part everyone overthinks, but you won't.
The crumb coat works because of what happens in the fridge. That thin layer of frosting firms up into a sealed barrier. When you apply the final coat over a chilled crumb coat, the spatula glides over a solid surface instead of dragging through soft frosting and pulling crumbs with it. The difference is dramatic.
The reason competitors fail and the reason so many beautiful homemade cakes end up with that crumbly, patchy look is a single skipped step: people apply the final coat immediately, while the crumb coat is still warm and soft.
The fresh frosting sticks to the unfirmed surface and lifts crumbs right back up. Twenty to thirty minutes in the fridge eliminates this entirely.
The reason the crumb coat needs to be thin is equally important. A thick layer tears the cake surface as the spatula drags over it, creating more crumbs, not fewer. Thin glides. Thick grabs.
And the separate crumb bowl? Once your main batch of frosting has cake crumbs mixed in, every stroke of the spatula deposits those crumbs on the surface. Keeping the batches separate means your final coat is perfectly clean before you even begin.
In Nonna's kitchen, there's a saying for this kind of thing: the work you do before you show up is what everyone sees when you arrive. The crumb coat is that invisible work. It's what makes a homemade cake look like love was baked into every layer.
Elena's No-Fail Tips for the Perfect Crumb Coat
Does my crumb coat have to look perfect?
Not even a little. In fact, if your crumb coat looks smooth and beautiful, you've probably put on too much frosting. A good crumb coat is thin enough to see the cake through in spots, rough around the edges, and maybe a little crumbly.
That's the whole point: all of that gets sealed in and hidden by the final coat. Permit yourself to let it look messy. You're not done yet.
Fridge or freezer, and how long?
Fridge, always. Twenty to thirty minutes is the sweet spot that works reliably for most buttercreams. If you have more time, up to two hours is fine. The cake will just be firmer and even easier to work with.
The freezer is tempting because it's faster, but it carries a real risk: the rapid temperature change can cause the buttercream to crack.
Those cracks can show through your final coat and are very hard to fix. The refrigerator is slower, gentler, and trustworthy. It's worth the wait.
Can I crumb coat my cake the night before?
Yes, and honestly, it's a gift. Crumb coat your cake, cover it loosely with plastic wrap (don't press the wrap against the frosting), and leave it in the fridge overnight.
The next day, let the cake sit out for 15–20 minutes to take the chill off slightly, then apply your final coat. The crumb coat will be perfectly firm, the cake will be easy to work with, and you'll feel wonderfully calm instead of rushed.
This is how I handle cakes for family gatherings. Split the work across two days, and the whole thing feels manageable rather than stressful.
Do I need a turntable?
It helps a lot, but you don't need one. A lazy Susan from the kitchen cupboard works almost as well. No lazy Susan? Set your cake on a plate and rotate it by hand as you work, one quarter turn at a time.
It takes a little more attention, but the result is the same. Don't let a missing tool stop you from taking this step.
Can I use ganache instead of buttercream for a crumb coat?
Yes, and for certain cakes, especially those being covered in fondant, ganache is actually the stronger choice. It sets firmer than buttercream and gives an even more solid foundation.
The trade-off is that ganache sets faster, so you have less time to work with it. If you're comfortable working quickly, ganache is wonderful. If you're just learning the crumb coat, start with buttercream; it's more forgiving and gives you time to breathe.
Saving a Little Joy for Later Storage, Make-Ahead & Freezing Notes
You've put real care into this cake, and I want to make sure none of that effort is lost.
Crumb-coated cake in the fridge: Once crumb-coated, your cake can sit loosely covered in the refrigerator for up to two days before you apply the final coat. This is ideal for cakes you're preparing in advance for a party or celebration.
Fully frosted cake: If you're serving within a day, a frosted cake is perfectly happy at cool room temperature, away from direct sunlight. For anything longer, return it to the fridge. Bring it out an hour before serving so the frosting softens back to that lovely, just-made texture.
Freezing a crumb-coated cake: You can absolutely freeze a crumb-coated cake. This is one of my favorite tricks. Let the crumb coat firm up completely in the fridge first, then wrap the cake tightly in two layers of plastic wrap.
It will keep beautifully in the freezer for up to a month. When you're ready, transfer it to the fridge overnight to thaw, let it sit at room temperature for 30 minutes, then apply your final coat. It will look and taste exactly as if you just baked it.
One More Thing: The Naked Cake Trick
Here's something worth knowing: the crumb coat doesn't have to be hidden.
The "naked cake" look, where the frosting is intentionally thin and the cake layers peek through, is nothing more than a crumb coat worn as the final finish. No second layer needed.
Just a careful, slightly thicker-than-usual crumb coat, smoothed cleanly with a bench scraper, and you have a cake that looks effortlessly beautiful. Rustic, natural, and somehow more elegant than heavily frosted alternatives.
If you're making a cake for a summer gathering, a casual birthday, or any occasion where you want something that looks unfussy but made with care, try stopping after the crumb coat. Let it be enough. It often is.
Making Sweet Memories
I still think about Lucia's birthday cake, sometimes the one that started with panic and crumb-streaked frosting. I remade it.
Properly, this time, with a crumb coat underneath and thirty minutes of patience while it chilled in the fridge. When I brought it to the table, Lucia gasped a little. "It looks like it came from a bakery," she said.
I didn't tell her it was the same recipe, the same buttercream, and the same hands. Just one extra step, and it was a different cake entirely.
That's what the crumb coat gives you. Not a complicated technique. Not years of training. Just a thin layer of frosting, a little patience, and a finished cake that looks like you meant every part of it.
If you want to go further, the frosting consistency guide on this site will help you get that buttercream to exactly the right texture before you start, and if you want a smooth, glossy final finish, the how-to-smooth-frosting guide walks you through every tool and technique.
At AddCakes.com, we believe in memories, not masterpieces. And sometimes, all it takes to make both is a thin layer of frosting and a little faith in yourself.
[…] a small divot or hole in your layer, don't worry. A generous application of buttercream during your crumb coat will fill it fully. Under the final layer of frosting, nobody will ever know. […]
[…] layer cake twice: once because I didn't cool it, and once because I was too impatient with the crumb coat. I felt like a […]