
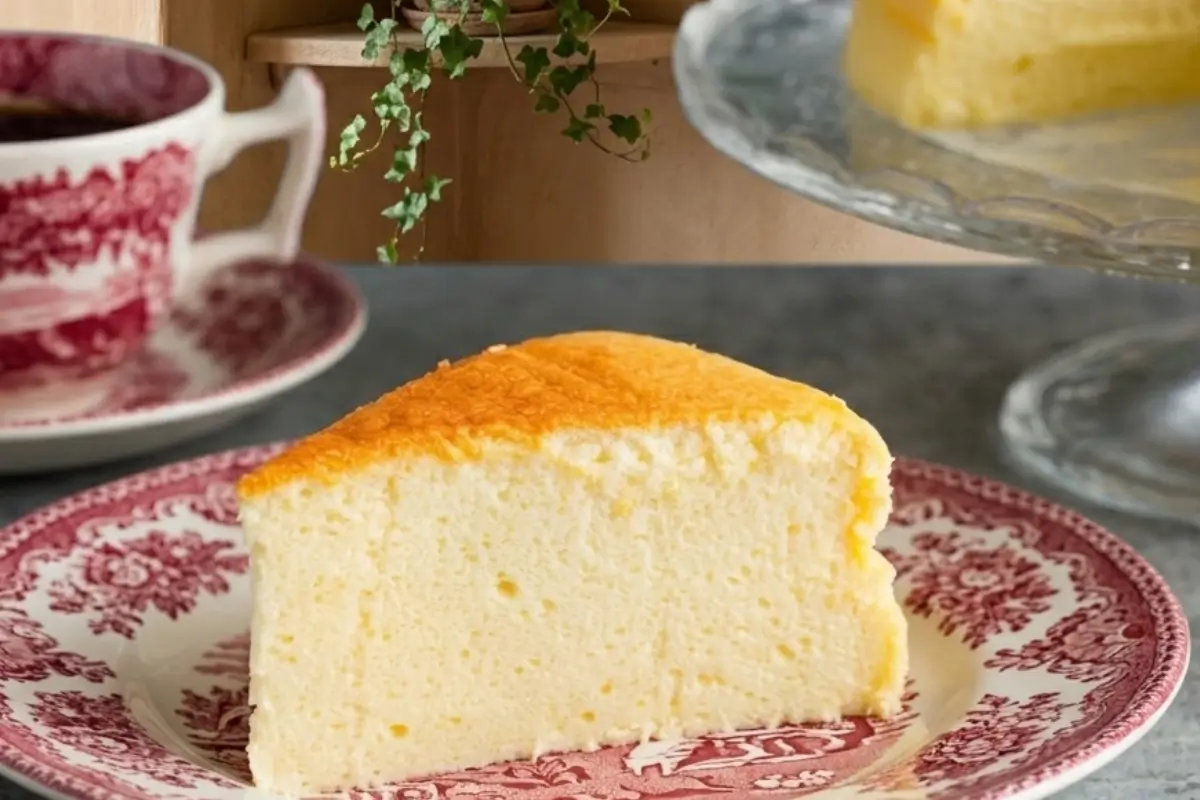
Japanese cotton souffle cheesecake was the first recipe that ever made me stand completely still in my kitchen.
I had seen the videos who hasn't- of that soft, golden dome wobbling like it was alive the moment someone tapped the pan. I remember watching it on my phone one evening and thinking, that is the most impossible, beautiful thing I have ever seen, and I need to figure out how to make it.
I was not prepared for what came next.
The first time, the top cracked clean across like a fault line. The second time, it came out of the oven looking perfect, then collapsed completely before I even made it to the counter.
I stood there staring at a sunken, wrinkled thing that bore absolutely no resemblance to the cloud-soft beauty I had imagined, and I thought: What am I doing wrong?
If you've felt that exact defeat, I want you to know something: you were not doing anything wrong. You were missing the right information. The same information that took me three tries and a lot of wasted cream cheese to finally understand.
This recipe is going to give you that information. All of it.
The Bridge: It All Comes Down to Three Things
Before we bake a single thing, I want to be honest with you about why this recipe fails, because nobody else seems to say it plainly.
There are three Jiggle Killers lurking in this recipe. Most people stumble into one of them without even knowing it exists.
Jiggle Killer 1: Beating the egg whites to the wrong peak stage. One beat too many, and the whole cake structure falls apart.
Jiggle Killer 2: Cooling shock. The cheesecake comes out of a warm oven into cold air, contracts suddenly, and collapses. It feels like failure. It is actually just physics and completely preventable.
Jiggle Killer 3: Pulling the cake too soon because the top looks golden and done. The top is not the truth. The wobble is the truth.
Once you know these three villains by name, you can stop them. And that is exactly what we are going to do today.
What Makes Japanese Cotton Souffle Cheesecake Different?
This part is easier to understand than you might think, and understanding it makes the whole recipe click.
A classic New York cheesecake is rich, dense, and solid, all cream cheese and eggs, baked into something you can cut with a firm hand. A Japanese cotton souffle cheesecake lives in a completely different world. It is half cheesecake, half chiffon cake.
Light as air. Softly tangy. Its texture reminds you of a cloud or, when it's warm from the oven, something that actually trembles if you look at it wrong.
The difference comes entirely from the meringue.
Instead of mixing whole eggs into the batter, this recipe separates the eggs. The yolks go into the cream cheese base. The whites are whipped into a meringue, those soft, glossy peaks, and then folded gently into the batter. That folded meringue is the air. That air is what makes it cotton. That air is what produces the jiggle.
This is why every decision in the recipe the peaks, the fold, the water bath, the cooling is in service of protecting and preserving that air. Once you understand that, everything else makes sense.
You're already doing beautifully let's keep going.
The Key Ingredients for Japanese Cotton Souffle Cheesecake and Why They Matter
Don't let the ingredient list intimidate you. Each one is here for a reason, and knowing the reason makes you a more confident baker.
Cream cheese (full-fat, block-style): This is the flavor foundation. It must be fully at room temperature, not slightly soft- fully soft and spreadable. Cold cream cheese leaves lumps in the batter, and lumps tear through the meringue when you fold.
Here's the trick I learned the hard way: set it out at least two hours before you start, or let it sit in a bowl of warm water for 20 minutes.
Butter (unsalted, softened): Softened means yielding, not melted. Melted butter changes the emulsification of the batter and affects how the final texture holds together.
Eggs (separated): Cold egg whites actually whip up with more stability than room-temperature ones. Take your cream cheese and butter out early, but keep the eggs in the fridge until the moment you need to separate them.
Cake flour: Cake flour has a lower protein content than all-purpose, which is why it gives such a tender, delicate crumb. If you only have all-purpose flour, you can substitute 90g of all-purpose flour in place of every 100g of cake flour, and sift it twice for lightness. For a gluten-free version, rice flour (also called Mochiko) works beautifully as a 1:1 substitute.
Cornstarch: This is the secret to that cloud-like interior. It softens the crumb and adds a little structural stability without making the texture dense. Don't skip it.
Lemon juice: People assume this is just for flavor, and it is slightly tangy and lovely, but lemon juice also acts as a meringue stabilizer. It helps the egg whites hold their peaks. Both jobs matter.
Granulated sugar: Divided between the batter and the meringue. Adding it gradually to the whites, rather than all at once, gives you a glossier, more stable meringue.
See? Every single ingredient is earning its place. This is where the magic starts to happen.
The Golden Rule Step-by-Step Instructions
Take a breath this part is more manageable than it looks. Work through it one step at a time, and you'll be fine.
Step 1: Prepare your pan
Line the bottom of an 8-inch round pan with parchment paper and butter the sides lightly. If you are using a springform pan, and many of us do, this is the moment that matters most for a watertight water bath.
Wrap the outside of the pan with two full layers of aluminum foil, pressing it tightly up the sides. Water sneaking into a springform pan is the 1 equipment complaint I hear from home bakers. Double foil is your solution.
If you can use a solid cake pan with no removable bottom, it eliminates this worry.
Step 2: Set up your water bath
Pour hot water (straight from a just-boiled kettle) into a larger baking tray or roasting pan, enough to reach about 1 inch up the side of your cake pan.
Place the empty tray on the oven's middle rack and preheat the oven to 300°F (150°C). The water needs to be hot when the cake goes in, so the humidity in the oven is already doing its job from the first minute.
Why hot water? Cold water takes time to heat, and you lose the humidity protection during the most critical early minutes of baking.
Step 3: Make the cream cheese base
In a medium saucepan over low heat, gently melt the cream cheese, butter, and milk together, stirring slowly until completely smooth. The smell at this point warm, subtly tangy, a little buttery is the first sign that something good is coming.
Remove from heat and let it cool for a few minutes. Then whisk in the egg yolks, one at a time. Sift the cake flour, cornstarch, and a small pinch of salt directly into the pan and stir until silky. For the smoothest possible batter, pass it through a fine sieve into a clean bowl.
Keep this bowl resting in a pan of warm water (about 110°F / 43°C) while you prepare the meringue. A warm batter accepts the meringue more gently and reduces the risk of deflation.
Step 4: Make the meringue the most important step
This is Jiggle Killer 1 territory, so stay with me.
Make sure your mixing bowl and whisk are completely clean and dry. Even a trace of fat will prevent the whites from whipping. Start beating the cold egg whites on medium speed until they are foamy and white. Add the lemon juice. Then begin adding the sugar slowly, a tablespoon at a time, while the mixer runs.
Increase to medium-high speed and watch carefully.
You are looking for soft-to-medium peaks. Here is exactly what that means: when you lift the whisk, the meringue should hold a peak that curls gently downward like a wave that bends at the tip. It should look glossy and smooth, not dry or clumpy.
If the peak stands completely straight and stiff without any movement, you have gone too far. Stiff peaks break down when folded and crack when they bake.
A quick test: Tip the bowl slightly. The meringue should slide slowly, not sit completely rigid.
Switch to low speed for the final two minutes to smooth out any large air bubbles a tip that makes a real difference to the final texture.
Step 5: Fold the meringue into the batter
Most people either rush or overthink this step. Here's the truth: it's a gentle conversation between the two.
Add about one-third of the meringue to the cream cheese batter and whisk it in fully this lightens the batter so the rest of the meringue isn't fighting against something heavy.
Then add the remaining meringue in two parts, using a large spatula to fold with a slow, deliberate cut-and-turn motion. You're moving under and over, not stirring in circles.
Stop when there are just a few faint white streaks remaining. A couple of streaks are perfectly fine. Overmixing to eliminate every last streak is how the air disappears.
If yours looks a little pale and slightly uneven at this point, that is completely normal. You're on the right track.
Step 6: Bake
Pour the batter into your prepared pan and tap it gently on the counter once or twice to release any large air bubbles. Lower the pan carefully into the hot water bath in the oven.
Bake at 300°F (150°C) for 60–90 minutes. I know that's a wide range, but every oven is different, and this is where you need to use the wobble test rather than the clock.
The visual doneness trap: The top of the cheesecake will turn golden well before the inside is ready. A golden top does not mean a done cheesecake. If you pull it out because the top looks finished, the inside is most likely still underdone, and it will collapse the moment it cools. This is Jiggle Killer 3.
The wobble test: Wearing oven mitts, gently nudge the oven shelf. The center of the cheesecake should move with a slow, even wobble, firm and rhythmic, like Jell-O set in a bowl. It should not slosh like liquid. It should not be completely rigid. Firm wobble = done.
If you prefer a thermometer, the internal temperature of the center should reach 150°F (65°C).
Step 7: The Slow Goodbye
This is the step that separates a collapsed cheesecake from a triumphant one. This is Jiggle Killer 2, and it is entirely preventable.
When the wobble test passes, turn off the oven. Open the oven door 2–3 inches, prop it with a folded kitchen towel or a wooden spoon, and leave the cheesecake inside the oven for one full hour.
Do not rush this. Do not pull it out early to check. The gradual cooling inside the warm oven lets the structure settle slowly without the shock of cold air.
Some deflation will still happen the cheesecake will shrink slightly, about half an inch, and that is expected. What you are preventing is the dramatic collapse that happens when the temperature change is sudden.
After an hour in the oven, transfer to the counter for another 30 minutes. Then refrigerate for at least 4–6 hours, or overnight.
I know waiting overnight feels like the longest thing in the world. But the cold sets the texture into something truly extraordinary. You're closer than you think keep going.
Why This Recipe Works The Three Jiggle Killers (And How to Beat Them)
Let's gather everything together now. This section is your safety net, a reminder of what's happening inside the batter and why the steps you just followed actually work.
Jiggle Killer 1: The Wrong Peaks threaten the meringue stage. Stiff peaks contain overstretched protein networks that snap and break when folded into a heavier batter.
The result? Large deflated air pockets, a dense or rubbery texture, and cracks in baking. Soft-to-medium peaks maintain flexibility; they fold in smoothly, carry their air without resistance, and expand gently in the oven's heat.
Jiggle Killer 2: Shock Cooling strikes after baking. The cheesecake is full of expanded steam and air bubbles held delicately in place. A sudden drop in temperature causes rapid contraction; the air escapes faster than the structure can adjust, and the middle sinks.
The Slow Goodbye: one hour with the door ajar is not a suggestion. It is what makes the difference between a beautiful dome and a sad crater.
Jiggle Killer 3: The Visual Doneness Trap catches experienced bakers as often as beginners. The top sets and browns first, while the center, dense with moisture and cream cheese, takes much longer.
Pulling too early based on visual cues alone produces an underdone center that collapses as it cools. Trust the wobble, not the color.
And then there is the water bath, which is not optional, despite what any viral shortcut video may claim.
The water creates a humid oven environment that prevents the exterior from setting faster than the interior and keeps the cheesecake moist throughout the long bake.
Without it, the texture is dense, the top cracks, and the characteristic cloud-like crumb never develops.
In my family, this is the moment when everything clicks when you understand the why, and the how suddenly feels like common sense.
Elena's No-Fail Tips for Japanese Cotton Souffle Cheesecake
Here's the part everyone overthinks, but you won't, because now you know what you're dealing with.
Why Did My Japanese Cheesecake Deflate?
The three possible causes are: insufficient baking time (the inside wasn't fully set when you pulled it), shock cooling (skipped or shortened the Slow Goodbye), or over-folded meringue (the air was beaten out during mixing).
Most often, it's the cooling. The good news: even if it deflates slightly and it almost always shrinks a little, a well-baked Japanese cotton cheesecake that has been chilled overnight still has that cloud-soft, melt-in-your-mouth interior.
A half-inch of shrinkage is not failure. It is completely normal. Serve it with a dusting of powdered sugar, and nobody will ever know.
Why Did My Cheesecake Crack?
The most common culprits are oven temperature too high (especially in ovens that run hot, an oven thermometer is worth every cent), meringue beaten to stiff peaks instead of soft, or the pan positioned too close to the top heating element.
If a crack appears, breathe. Dust with powdered sugar. Pile on some fresh strawberries. The flavor is unaffected, and as Nonna always said about anything that came out of the oven slightly imperfect, "it still tastes like love."
Can I Skip the Water Bath?
I understand why you're asking. Setting up a water bath is one more thing to manage, and the foil-wrapping is fiddly. But the water bath is what makes this recipe possible.
Without it, the heat hits the outside too aggressively before the inside has time to catch up the exterior sets, the interior steams unevenly, and the top cracks before the meringue has fully lifted.
For springform pans: two tight layers of heavy foil, pressed firmly up the sides. Or use a solid round cake pan and eliminate the leakage concern.
What Do Soft Peaks Actually Look Like?
Stop the mixer and lift the whisk straight up. A soft/medium peak will rise with the whisk and then curl over at the tip, like a gentle wave. It holds its shape enough to stand, but it bends rather than pointing straight up. The surface should look glossy and smooth, not dry or grainy.
If the peak stands up stiff and straight without any droop: stop immediately. You've gone slightly too far, but you may still be okay. Fold gently and quickly, and your cake may still be fine.
If the whites are dry, dull, and clumpy: over-beaten. Start fresh.
Saving a Little Joy for Tomorrow
This is the part where patience pays you back in full.
The cheesecake needs a minimum of 4–6 hours in the refrigerator before you serve it. I know. But the cold is not just chilling it it is setting the cream cheese into the texture you've been working toward all day.
Served warm or at room temperature, it will be soft and delicate. Chilled, it becomes something different: firm enough to slice cleanly, still cloud-light inside, with a flavor that has deepened and settled. Overnight is ideal.
In the refrigerator: Covered loosely with plastic wrap, it will keep beautifully for up to one week.
In the freezer: Wrap the whole cake (or individual slices) first in plastic wrap, then in foil. Freeze for up to three months. To serve, transfer to the refrigerator and let it thaw slowly overnight, never on the counter or in the microwave.
Serving suggestions: A gentle snow of powdered sugar is the most classic finish, and my personal favorite it's elegant without asking for anything more.
A thin brushing of warmed apricot jam is the traditional Japanese bakery glaze and gives the top a beautiful sheen. Fresh strawberries, a drizzle of honey, or a dusting of matcha all work beautifully too.
One note on the texture: The jiggle you saw in the oven that extraordinary, trembling wobble will firm up as the cheesecake chills. This is correct. After chilling, it becomes soft and springy, somewhere between a cloud and a firm custard. Both textures are wonderful; they're just different moments in the same cake's life.

The Most Magical Japanese Cotton Souffle Cheesecake
Ingredients
- 10.6 ounces full-fat cream cheese blocks
- 200 ml heavy whipping cream or whole milk
- 6 large eggs separated
- 4 Tablespoons unsalted butter
- 1 Tablespoon unsalted butter to grease the pan
- 4 1/2 Tablespoons sugar for the cream cheese mixture
- 1/2 cup sugar for the egg whites
- 2/3 cup cake flour
- 1/2 large lemon for the zest and 2 Tablespoons juice
- 2 Tablespoons apricot jam
- 2 teaspoons hot water
Instructions
- Preheat your oven to 350 degrees F and set a medium saucepan with 2 inches of water over high heat for your double boiler. Bring it to a simmer, then cover and reduce the heat.
- Prepare a 9-inch round cake pan by greasing it with butter and lining the bottom and sides with parchment paper. Cut two extra parchment straps to crisscross on the bottom so you can easily lift the baked dessert out later.
- Separate your 6 large eggs. Keep the egg whites in the refrigerator until you are ready to use them.
- Place a large bowl over your simmering saucepan. Add the cream cheese, 4 Tablespoons of butter, heavy cream, and 4 and 1/2 Tablespoons of sugar. Mash and whisk everything together until beautifully smooth, then remove from the heat.
- Whisk in the egg yolks one by one, making sure each is fully mixed in. Sift the cake flour into the bowl and whisk until no dry spots remain.
- Pass this batter through a fine-mesh strainer into a clean bowl, then stir in your lemon zest and lemon juice.
- Place a large baking sheet inside your preheating oven and pour in hot water until it is half an inch deep to create a warm bath.
- In a stand mixer, beat your cold egg whites on low for 30 seconds, then medium for 2 minutes until foamy and bubbly. Slowly add the 1/2 cup of sugar while mixing.
- Turn the speed up to medium-high and beat until firm peaks form. The egg whites should hold their shape with the tip folding back slightly when you lift the whisk.
- Gently fold one-third of the meringue into your cream cheese batter. Fold in another third, and finally pour the batter into your mixer bowl with the last of the meringue, folding until just combined.
- Pour the batter into your prepared pan in a steady stream. Tap the pan on the counter a few times to release any trapped air.
- Place the cake pan directly onto the baking sheet in the oven's water bath. Lower the oven temperature to 320 degrees F and bake for 70 to 75 minutes. Then, drop the heat to 300 degrees F and bake for 10 more minutes until the top is a beautiful golden brown. Do not take it out yet.
- Turn off the oven and leave the door slightly ajar for 15 to 20 minutes so everything can cool gradually without collapsing.
- Carefully lift the treat out of the pan using your parchment straps. Mix the apricot jam with hot water and gently brush it over the top. Let it cool to room temperature, then chill in the fridge for at least 4 to 6 hours before slicing.
Notes
Making Sweet Memories
The first time I finally got the jiggle I mean the real jiggle, the one that makes you gasp a little I tapped that pan three times just to watch it happen again.
It wasn't a miracle. It was just the right information, applied with patience.
If your first attempt doesn't go perfectly, I promise you: the second one will be better. And by the third, you will be the person everyone calls when they want something extraordinary at the table. That is how this recipe works. That is how every good recipe works.
Japanese cotton souffle cheesecake is a little demanding. It asks for your attention, your patience, and your willingness to trust the wobble over the visual. But what it gives back that tender, cloud-like, subtly tangy slice that melts before it even reaches the back of your tongue is absolutely worth every careful step.
Did you get the jiggle? I hope you did. Leave a comment and tell me how it went. Every attempt tells me something, and I want to hear yours.
At Add Cakes, we believe in memories, not masterpieces. This one is yours to keep.
Elena 