
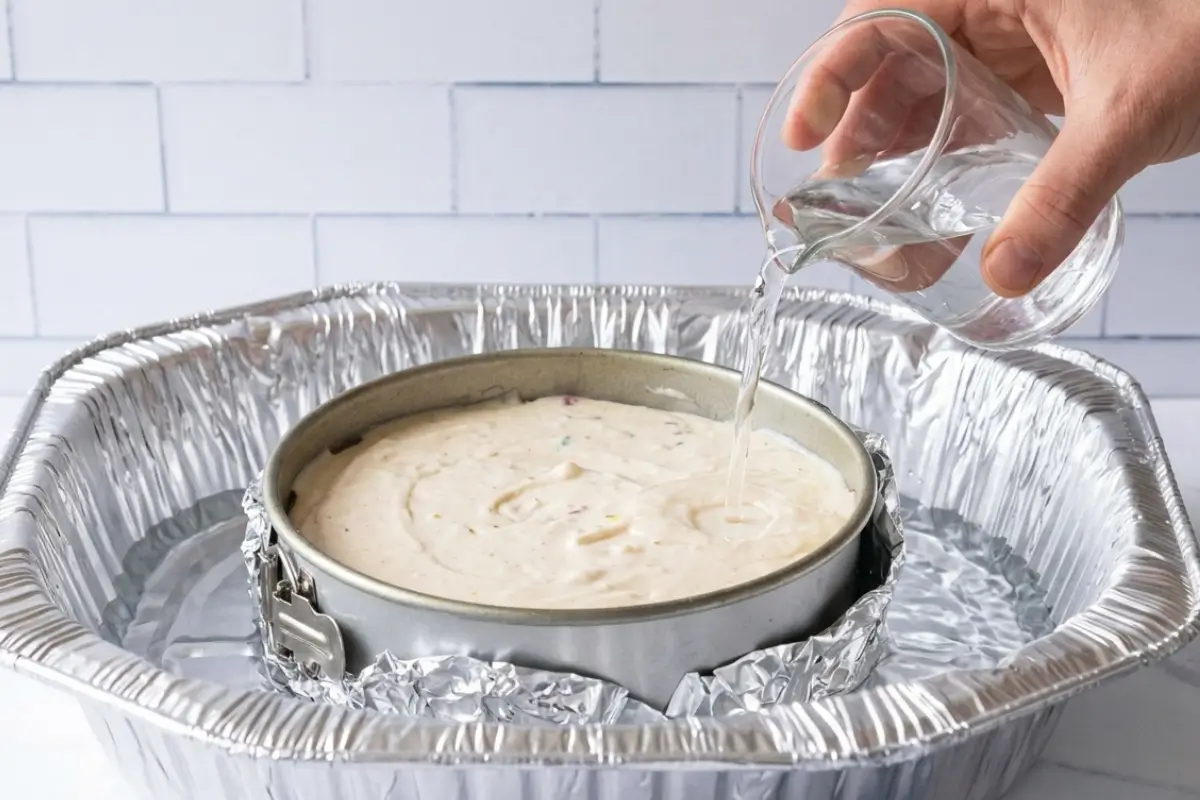
Cheesecake water bath guide those four words used to fill me with dread. I still remember the first time I attempted a proper baked cheesecake. It was for my mother's birthday.
I had spent the better part of a Sunday afternoon on that cake, pressing the crust just so, folding the filling gently, and watching through the oven glass as it rose slowly into something golden and beautiful.
When the timer rang, I opened the oven door, and there it was: a crack running right down the centre of the top, wide as a fault line.
I sat on the kitchen floor for a good five minutes.
My mother ate it anyway; she said it tasted better than anything, but I quietly decided that was the last time. I went back to basics. I learned the water bath properly, from start to finish, not just the wrapping part. And the next cheesecake I made came out of the oven with a top so smooth and unbroken it looked almost unreal.
That's what I want to give you today.
This guide covers all three parts of the water bath process: how to wrap your pan so water never sneaks in, how to bake your cheesecake gently and evenly, and this is the part almost everyone skips how to cool it so the top stays perfect from oven to table.
Most recipes hand you the water bath instruction and leave you to figure out the rest. Not here. We're doing this together, from the first sheet of foil to the moment the springform release snaps open.
What Is A Cheesecake Water Bath And Why Does It Actually Matter?
This part is simpler than it sounds, I promise.
Cheesecake is not really a cake it's a custard. The filling is mostly cream cheese, eggs, and dairy, and like all custard-based desserts, it is incredibly sensitive to heat.
When the temperature rises too quickly or unevenly, the egg proteins tighten, contract, and pull apart at the surface. That tightening is what creates the crack.
A water bath changes everything about how heat reaches your cheesecake. The water bath can't exceed 212°F, the boiling point of water, no matter how hot your oven is set.
So while the oven itself might be 325°F, the water around your cheesecake keeps the environment it actually bakes in at a much gentler level. The edges and centre cook at the same rate, slowly and together, instead of the edges racing ahead while the centre is still liquid.
Think of the water as a buffer between your oven's fierce heat and your cheesecake's tender heart.
The steam created by the bath also keeps the oven environment moist, which means the surface of your cheesecake doesn't dry out and pull apart as it bakes.
Without the water bath, cracks are almost certain. With it, you're giving your cheesecake the gentlest, most even start it could possibly have.
You're already doing beautifully, and we haven't even started the recipe yet.
What You Need Before You Start
Take a breath there's nothing here you need to rush out and buy.
For a standard 9-inch cheesecake, you'll want:
A 9-inch springform pan
A deep roasting pan large enough to hold the springform with at least an inch of space around it
Heavy-duty, 18-inch-wide aluminium foil. This is the single most important item on this list. Standard 12-inch foil is too narrow to wrap a 9-inch springform pan fully and will leave gaps at the sides.
This is the number-one reason water gets into homemade cheesecakes. Write it on the shopping list right now: 18-inch, heavy-duty.
A kettle or small pot for boiling the water
The nest method alternative: If you have a 10-inch round cake pan that fits snugly around the outside of your springform, you can skip the foil entirely. Simply slide the springform inside the larger cake pan, then lower the whole thing into the roasting pan of hot water. The outer cake pan creates a completely watertight barrier.
This is the method I use most often now it takes the guesswork out of foil wrapping entirely. Here's the trick I learned the hard way: not every springform brand fits neatly inside a standard 10-inch cake pan. Check the fit before you fill the cheesecake.
If you have these four things- a springform, a roasting pan, proper foil, and boiling water you have everything you need.
How To Set Up Your Cheesecake Water Bath Step By Step
Here's the part everyone overthinks, but you won't, because we're going through it step by step and I'm not leaving any gaps.
The water bath is a three-step process: wrap the pan to keep water out, bake at low heat surrounded by hot water, and cool gradually to prevent post-bake cracks.
Step 1: Wrap your springform pan (before adding the crust).
Start with the foil before you do anything else. Tear off three sheets of 18-inch heavy-duty aluminum foil. Place the springform pan in the center of the first sheet and press the foil up firmly around all sides, molding it to the pan as tightly as you can.
Repeat with the second and third sheets, overlapping and pressing. The foil should reach the top rim of the pan on all sides with no gaps at the bottom seam.
If your foil tears while wrapping, stop and start fresh. A torn layer offers no protection. Most people press on with a torn layer don't. It takes thirty seconds to rewrap.
You'll know the wrap is right when you can press the foil against the pan's sides and it holds its shape without pulling away.
Step 1 (alternative): The nest method:
Slide your filled springform pan into a 10-inch cake pan. Lower both pans together into the roasting pan. No foil required. This is what I now think of as the foolproof version.
Step 2: Boil your water:
Fill a kettle or small pot with water and bring it to a full boil. This matters because cold or warm water from the tap will lower the oven temperature too much when you open the door and won't create the steam environment the cheesecake needs. Boiling water, poured carefully, maintains the right conditions from the very first minute.
Step 3: Place the cheesecake in the roasting pan first, then add the water.
This is the step most recipes bury in a parenthetical, and it's the reason water splashes inside the foil wrap. Set your foil-wrapped cheesecake into the centre of the roasting pan. Slide the entire roasting pan onto the oven rack, pulled out halfway.
Then pour the boiling water into the roasting pan around the cheesecake not into it, around it. Fill to approximately 1 inch up the sides of the springform pan.
If any water sloshes between the foil and the pan edge during pouring, blot the surface of the foil with a paper towel before sliding the rack back in. A small amount of surface moisture is fine; pooled water inside the wrap is not.
Gently slide the rack back in and close the oven door.
If you see a small wisp of steam when you close the door, that's exactly right.
Why This Cheesecake Water Bath Guide Works
Here's the part most guides skip entirely, and it's the reason so many home bakers end up confused even when they've done everything right.
The water bath is step one. But four things are working together that give you a flawless cheesecake:
The 212°F ceiling protects the filling: Water boils at 212°F and stays there, regardless of oven temperature. The surrounding bath acts as a ceiling on the heat your cheesecake actually experiences.
Even at 325°F, the filling bakes in a gentle 200°F-range environment. Those egg proteins never get the sudden heat spike that causes them to contract and crack.
Edge-to-centre evenness prevents pulling: In a dry oven, the edges of the cheesecake bake significantly faster than the centre. The edges firm up and start to set while the centre is still liquid.
As the centre finally catches up, it contracts and the tension at the already-set edge is where the crack forms. The water bath eliminates that gap.
Steam keeps the surface supple: The moisture in the oven keeps the cheesecake's surface from drying out while the interior is still baking. A dry surface cracks. A moist surface stays smooth and soft.
The wobble test is your doneness signal, not a toothpick. Most people press a clean cooking utensil against the centre of the cheesecake or check if it looks "set", but cheesecake is a custard, and it should not look firm while still in the oven.
Here's what to look for instead: gently tap the side of the roasting pan with a wooden spoon. The outer 2–3 inches of the cheesecake should look set and barely move. The centre 3-inch circle should have a gentle, unified jiggle. Think Jell-O, not soup.
If the entire surface sloshes like liquid, it needs more time. If there's no movement at all, it may be heading towards overbaked. That single, gentle centre wobble is your green light.
For bakers who prefer precision: a cheesecake is done at an internal temperature of 150–155°F measured in the centre.
You're so close to pulling a perfect cheesecake from the oven. Keep going.
Elena's No-Fail Tips
This is the section I wish I'd had the first time. Real questions, honest answers, no vague reassurances.
Why Did My Cheesecake Crack Even Though I Used a Water Bath?
This one breaks my heart a little, because it means you did the right thing and still felt like you failed.
Here's what most recipes never tell you: the water bath handles cracking during baking. But cracks can also happen after baking, during cooling, and they're caused by thermal shock.
When a hot cheesecake is removed from the oven and placed on a cold counter, the sudden temperature drop causes the filling to contract sharply. That contraction is what creates the post-bake crack.
The fix is the cooling protocol, and it has three stages:
Oven rest: When the cheesecake is done, turn the oven off, prop the door open a few inches (a wooden spoon works perfectly), and leave the cheesecake inside for 1 full hour.
The oven slowly loses heat with the cheesecake still inside, and the temperature drops gradually instead of suddenly.
Counter rest: Remove the cheesecake from the water bath and let it sit at room temperature for 2 hours.
Refrigerator: Cover and chill overnight or for at least 4 hours.
That oven door step is the one almost nobody mentions. Most recipes just say "cool completely". In my kitchen, we call it the slow goodbye you're letting the cheesecake take its time leaving the warmth. It makes all the difference.
Water Got Into My Cheesecake Is It Ruined?
Here's the thing: this has happened to more experienced bakers than you'd believe. Including me.
If you catch it during baking and there's a small amount of water around the outer edge of the foil, carefully lift the cheesecake using oven mitts, blot the top of the foil, and re-tuck.
A very small amount of condensation inside the foil is almost inevitable it's puddles of water at the base of the filling that cause a soggy crust.
If you discover post-bake that the crust is wet, chill the cheesecake overnight uncovered. The crust may compress and firm somewhat as it chills. The filling itself is almost certainly fine.
If the water got into the filling, you'll likely see a layer of liquid underneath the set filling when you slice it. At that point, the texture is compromised, but the flavour is usually still there.
Serve it from the pan in scoops rather than slices, with fresh berries on top, and call it a rustic cheesecake bowl. Nobody will complain.
Next time, go for the nest method.
Can I Skip The Water Bath?
I'll give you the honest answer: yes, with some adjustments.
The steam method is a legitimate lower-risk alternative. Instead of submerging your cheesecake, you place a large, oven-safe skillet filled with boiling water on the rack below the cheesecake.
The steam fills the oven and creates a moist environment without any risk of water seeping into your pan.
It's slightly less effective than a true water bath the protective heat buffering isn't quite as complete, but for many home bakers it's a perfectly workable middle ground.
If you're in that situation tonight and don't have a roasting pan, this is your path forward.
If you use the steam method, keep your oven temperature at 300–325°F, do not open the oven door mid-bake (temperature stability matters more with this method), and always use the cooling protocol above.
Can you skip moisture entirely and just bake low and slow? Some very experienced bakers do, but the margin for error is much tighter, and for a home oven with its natural temperature fluctuations, I don't recommend it. The water bath exists because it works.
Do I Need A Special Pan For A Water Bath?
You don't need anything fancy. What you need is a pan large enough that the springform pan fits inside with at least an inch of clearance on all sides, and deep enough to hold at least 1–2 inches of water without it sloshing over.
A standard large roasting pan is ideal. A deep 9x13 baking dish works for a 7-inch springform. A large Dutch oven, placed on the oven rack, can also work beautifully. The material doesn't matter what matters is the depth and width.
If the springform pan touches the walls of the outer pan, the heat distribution isn't even. An inch of clearance on each side is the rule.
Saving A Little Joy For Tomorrow
You did the hard part. Now let time do the rest, and time, it turns out, is one of cheesecake's best friends.
Cooling (the three-stage protocol):
Oven rest with door ajar: 1 hour, oven off
Counter rest: 2 hours at room temperature
Refrigerate: covered, at least 4 hours or overnight
Storage: Cheesecake keeps beautifully in the refrigerator, covered, for 4–5 days. Cover tightly with plastic wrap or store in a covered cake carrier to prevent it from absorbing other refrigerator odours.
Freezing: Individual slices freeze wonderfully. Wrap each slice tightly in plastic wrap, then in a layer of foil. Place in a freezer-safe bag. Freeze for up to 3 months. To thaw, transfer to the refrigerator overnight never thaw at room temperature, as this can affect the texture.
Make-ahead (and this is the part I love most): Cheesecake genuinely improves after 24 hours. The filling firms and settles, the flavours deepen, and the crust firms up beautifully. If you're making this for a celebration, bake it the day before. It will be at its very best by the time your guests arrive.
Making Sweet Memories
The next time you pull a cheesecake from the oven and the top is smooth, not a crack in sight, I want you to take a moment and just look at it.
It doesn't matter if the crust is slightly uneven or the surface has a tiny ripple near the edge. What matters is that you did the thing that scared you.
You set up the water bath, you wrapped the pan carefully, you trusted the wobble test, and you gave your cheesecake the slow, gentle goodbye it deserved. You made something that took patience and care, and it shows.
That's what this is really about not perfection, but the confidence that comes from understanding your bake.
My Nonna used to say that the kitchen rewards patience more than talent, and I believe her more every year. The water bath isn't complicated once you know what it's doing and why. And now you do.
At AddCakes, we believe in memories, not masterpieces. But a perfectly smooth, crack-free cheesecake makes a pretty beautiful memory all on its own.
Have you tried the nest method? Had a water bath victory (or a foil disaster)? Tell me in the comments I read every single one, and I love hearing about your kitchen moments- the good ones and the ones you learned from.
[…] cooling sequence is also the reason my water bath guide includes a separate section on cooling the two together, and if you're doing both, your cheesecake […]